Cherry Wheat Beer
Sometime around January, I shoved my face full into a cloud of sweet, malt-smelling steam as our kitchen windows fogged over, the Chicago winter still strong outside. I used our canning pot, which perched a little lop-sided on the stove, to get the rolling boil necessary to brew the beer. My own glasses fogged up just as much as the windows as I hurled in the pellet hops. They broke apart, foaming up in the boiling wort, churning up their grassy, sweet citrusy aroma. I loved it. And I wondered why on earth I hadn’t been doing this the past decade.
Just like cooking and baking, there’s a ordered system of events to follow. And just like so many things in the kitchen, there are endless opportunities for playing around with flavors, combinations, and techniques. Do I want to put spices in the beer? Herbs? What about mixing up the hops? Or the yeast? Or the malt, wheat, etc? The possibilities are dizzying and exciting. Not to mention that all things considered, brewing beer is remarkably easy. And with the availability of home brewing stores on the rise, not to mention being able to order just about anything with a few mouse clicks, all you need is time and money. Which I suppose is like most things in the end.
Since January, I’ve brewed a handful of batches. And this is the latest, inspired by a couple pounds of frozen cherries and the leftover grains from an earlier brew. I also had a pack of liquid yeast in the fridge and some hops. I’m not really here to tell you exactly how to brew this beer. There are experts out there to do that. Books and books and websites and websites. But I will give you a rough idea, and I can tell you with certainty that it’s easy and a lot of fun. Get your hands dirty and brew your own.

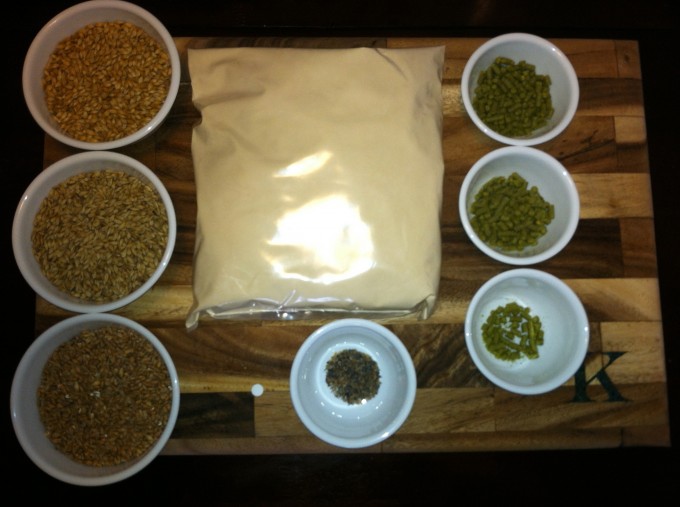
Everything ready to brew
On the left are the grains: unmalted wheat, organic 2 row and carapils (the latter two are malted, which involves wetting the grain, heating to allow the seed to begin to germinate, releasing enzymes essential for turning the starch with the grain into sugars, and then drying the grain to stop the process). These three provide flavor, sugars, and head retention. The big square is dried malt extract, which behaves a little like cotton candy, a close approximation of what it is if cotton candy were made of malt syrup instead of colored sugar. It gets ridiculously sticky with the least amount of moisture. And it’s hard to clean off a stove after it gets that least hint of moisture such as around two gallons of boiling water. The three bowls on the right are hops – Amarillo and Simcoe to be specific. The bottom bowl is Irish Moss, a misleading name for seaweed. First things first. I put the grains in a big ol muslin bag. Time to party.

Grains ready to steep
I steep the grains in about six quarts of water around 165 F. It starts smelling good almost immediately. Note my classy use of a canning pot. I don’t recommend its use for this.

Grains steeping away.
Once the grains steep for anywhere from 30 minutes to 45, we sparge a half gallon of water through the grains. Sparging is the process of running water through the grains to collect as much fermentable sugars as possible. There are better set-ups than this if you’re wondering.

Grains pre-sparge
I brought my wort up to a boil and tossed in the first addition of hops. The pellets immediately break apart as the mixture foams up.

Rolling boil after first addition of hops
Depending on the beer, you might put in all kinds of things – more hops (which I did), spices, herbs, honey, and the list goes on. When the boil ends, you need to cool the wort down as quickly as possible to help prevent any contamination of the wort from all the different bacteria and bugs floating around a kitchen or wherever. I started this off by tossing in the cherries. This pasteurized them even as it began to flavor the wort.

Sweet cherries into the boil
I used ice and cold water to bring the volume up and to cool it down to about the temperature of the yeast, which had been sitting out for hours. I scooped up about half of the cherries and dumped them into the fermenting bucket. Before pitching the yeast, which just adding it to the wort, I poured off a small amount into this tall vessel and floated my hydrometer in the wort. The device measures the density of sugars, essentially gathering the amount of potential food for the yeast and thereby the potential alcohol content the yeasts will produce.

Taking a hydrometer reading
After taking the final reading and verifying the wort remained at room temperature, I could safely pitch my yeast. I used a “smack pack” from the company Wyeast. You literally smack the outside pouch to pop the inside one, releasing the yeast into a healthy slurry so they can wake up and reproduce until I pour the whole thing into the wort.

Pouring yeast into the aerated wort
I closed the lid and let the thing hang out in the kitchen, our coolest room in this summer’s heat waves, so that it doesn’t get too hot. In the small hole on the lid, I popped in an airlock to allow the carbon dioxide created by the yeast to flow out without letting any other air or bacteria inside. The thing bubbled away by the next morning. I bottled it two weeks later with some corn sugar.
I’m happy to report the beer is delicious, and I’m already thinking about my next batch.
Recent Posts
- My Desert Boots!
- An Attempt at Living Out Loud
- Book Review - Growing a Farmer
- Fall Galette
- Ground Cherry Hand Pies